Tuesday, July 31, 2012

IKEA


 I just love IKEA!!  Please tell me you shop there too?!  I am blessed to have an IKEA store in close proximity to our home and love to go and wander around for inspiration.  Of course I always come home with a few new treasures so I am not certain my husband would call the store a blessing {?} !  Saturday when my in-laws were visiting, we took a trip to IKEA so I could purchase some more storage boxes for organizing items for our bookcase. (a.k.a. hiding non baby-proof items from our son!} 

KASSETT Box with lid IKEA This box is suitable for storing your newspapers, magazines, photos or other memorabilia.

I am sure you can relate to going into a store for just one item and you depart with many more items that weren't on the list. That was our experience on Saturday.  You must remember though that Grandma and Granddad were visiting and the act of 'spoiling' their grandson would be an understatement! Below are our fun finds.

KALAS Bowl IKEA Stackable; takes up very little storage space. Made from durable plastic, dishwasher- and microwave-safe. BPA free.KALAS Plate IKEA Stackable; takes up very little storage space. Made from durable plastic, dishwasher- and microwave-safe. BPA free.

Children's plates and bowls were on sale for 99 cents!  These are great to have on hand and if for some reason you have to toss one or it goes missing, you're not out a lot of money. They come six in a pack in primary colors red, orange, yellow, green, and blue.

BUSA Play tunnel IKEA No assembly required; easy to use. Easy to press together; takes up little space when not used.


Little Love is in the phase of loving forts and tunnels.  This tunnel sells for $14.99 at IKEA and is very sturdy and durable.  It has Velcro to secure it closed for storage which is a huge selling point for us.  It has been a huge hit in our home the last few days and not just for our son...daddies and granddads can have fun with it too!

LILLABO 20-piece basic train set IKEA Enough pieces to build different configurations. Total track length 10 ft.

My brother will be thrilled to know our Little love now owns a train track! I understand there are a lot of compatibility issues when purchasing Thomas the Train and other brand cars and track so we decided to start with an IKEA basic 20-piece train set for $9.99. 

MULA Bead roller coaster IKEA Develops fine motor skills and logical thinking.

Granddad said that Little Love wanted this toy.  I guess I can't say much when Granddad was willing to purchase it!  For $7.99 it has provide much entertainment.

BEKVÄM Step stool IKEA Solid wood, a hardwearing natural material. Hand-hole in the top step makes the step stool easy to move.

Little Love is gaining more and more independence as he grows each day. We have set routines for washing his hands, face and teeth which included mommy holding him over the sink.  I am thankful to say that IKEA sells this step stool for $14.99 and it can now be found in our bathroom to assist Little Love in his routines!  Of course supervision is still required but it no longer includes me trying to hold Little Love and wash him.

I look forward to a return trip to IKEA in the near future to purchase more decor, toys and whatever else sparks my interest! What have you purchased from IKEA recently?

Disclaimer:  All thoughts related to IKEA and IKEA product reviews are initiated on my own. I am not paid for advertising or featuring their product. All photos are from ikea.com

Monday, July 30, 2012

family

Pinned Image

 I found this sign on Pinterest that describes the blessing of our family and what Matt and I desire for our future family. The concept of family has been on my heart as we have been hosting family members for the last ten days. Last weekend my parents came to visit for four days followed by my twin sister who departed on Saturday and my in-laws were here Friday through this morning. It has been so wonderful being in the company of family.  Yes, there are dishes piled up, the laundry is overflowing and there are toys strewn about but it is a true sign that our home has been 'loved' on and lived in the past week. We have spent our time doing fun activities, laughing, playing with little love and just trying to enjoy one another's company. Nothing can compare to spending time with the ones who love you through and through; they just 'get' you and support you through it all.  Visits from family have keep us motivated during the hard days and bring a bit of 'normalcy' to this season of life when distance separates us. Not everyone has the privilege of saying that they have loving parents, in-laws, and siblings who have enriched their lives.  I give thanks to God that I have been so blessed that I desire to spend time with my family - to grow, strengthen, have fun and encourage one another. I pray that God would continue to put a desire in my heart to implement, learn and teach the values in the sign above so we may be a family that honors Him and loves each other well.

Sunday, July 29, 2012

Olympics!!!


Oh how I love the Olympics!!  The games are in full swing and I just can't get enough!  What events have you been watching?  I've had the opportunity to view volleyball, men's gymnastics, and beach volleyball. We have also used our ipad to stream men's swimming, fencing and the women's swimming prelimiaries live. I love a good story and am following the men's swimming closely to see how many medals Michael Phelps wins and the successes of  Ryan Lochte. Our 16-month-old son has recognized the TV has been on more since Friday's Opening Ceremonies than in his lifetime and is loving it.  He is showing a great interest in watching the sport events and is getting into the Olympic spirit!  Today we hope to watch the Men's Water Polo game.  Check your local cable company listing for viewing times and channels as unfortunately it will determine your ability to watch the coverage.
More updates to come. Go Team USA!!

Thursday, July 26, 2012


In this journey of life, we experience many seasons and God calls us to be thankful in all circumstances {1 Thessalonians 5:18}.  I want to live so that my expression of thankfulness can encourage others, give hope, and bring new perspective so we can all live with hearts that are more thankful for every day blessings.

7.26.12

Today I give thanks for my twin sister, Emily.  We often are asked "What is it like to be a twin?" and we commonly respond that we don't know anything different.  One thing I can confirm is that having a twin sister is one of my greatest blessings.  God has blessed me not only with a sister but with a friend.  Emily has stood by my side through every life change and season weathering storms and cheering me through victories.  I am so very blessed to have someone who will encourage me, correct me, laugh with me, pray with me, shop with me, share with me, and love me through it all. Though our journeys have taken us in different directions and locations I am so thankful that I will have a friend till the end!
I love you, Emily!

Wednesday, July 25, 2012

{MMW} banana boats

Banana Boats Recipe

Love bananas, peanut butter and chocolate? Check yes! This is such a quick and tasty treat you'll definitely want to add it to your summer dessert list.  There are many variations to personalize this treat and make it work for liking and situation.

Banana Boats

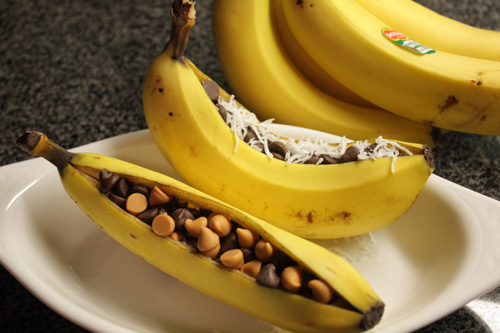
My sister introduced me to this dessert while visiting us in Michigan this past week and I love that she shared this yummy-ness with us!  The first time she enjoyed banana boats, a banana was cut down the length all the way through the peel on the top and the banana; cutting the banana into two pieces but not through the peel on the bottom.  Once cut, the banana was covered with a layer of peanut butter.  Then chocolate chips and mini-marshmallows were inserted in the opening - tucking them on the sides and on top.  The bananas were placed on a cookie sheet and bake for 10minutes at 300 degrees. It is common for them to roll over so do your best to balance them on one another and not place on the edge of cookie sheet.

When my sister decided to make these for us one evening during her visit, we decided to switch it up a bit and use Reese's peanut butter chips along with chocolate chips and marshmallows for our toppings.  Two thumbs up!  Honestly, using the peanut butter chips saved time and did not create a mess while trying to spread peanut butter on the banana halves. I guess it comes down to how much peanut butter you want with your banana.  We only had large marshmallows in the pantry so we just cut them down to make them an appropriate size to melt on the top of the banana.  We also placed them in the oven for about 10minutes at 300degrees. Note: the banana peel will turn black during the baking process! Watch carefully and remove when toppings are melted and marshmallows browned.

If you are looking for more creative ways to serve banana boats, click on the photos above for other banana boat tutorials I found on Pinterest.  The options are endless! You can wrap them in foil and grill them, add butterscotch chips or coconut on the top etc. Great for camping or a special dessert after a day at the pool.  How fun would it be to have a 'toppings' bar and let everyone assemble their own banana boat at a neighborhood party. And surely you can call it a 'healthy treat' since the base is a banana, right?!
Grab a banana and your favorite toppings and enjoy a banana boat today!

Thursday, July 19, 2012

thankful


In this journey of life, we experience many seasons and God calls us to be thankful in all circumstances {1 Thessalonians 5:18}.  I want to live so that my expression of thankfulness can encourage others, give hope, and bring new perspective so we can all live with hearts that are more thankful for every day blessings.  And with that, "Give Thanks Thursday" is initiated here on foreverfancybyfaye. Please join me on Thursdays while I document the journey of having a thankful heart.

7.19.2012

I am thankful that my 16-month-old son woke up this morning asking for his daddy.  This made my heart happy knowing that our little love was possibly recalling last evening when daddy made it home before bedtime and was able to spend time with his son.  My husband is a surgery resident and needless to say works a very demanding schedule at the hospital.  Evenings when daddy arrives home before bedtime are treasured moments in our lives and last night was one of them.  Today I'm holding onto the joy that was experienced last night when my husband and son were able to play and laugh together.

Wednesday, July 18, 2012

{MWW} Fresh Cherry Pie


Every Saturday at our local Farmer's Market, there is a raffle drawing for items donated by the venders.  I happened to sign up a few weeks ago and was surprised to receive a call that I had won! The winnings were quite impressive and I was so thankful to be the recipient of so many wonderful items.  

I received a large amount of fresh Bing cherries and went to Pinterest to search for cherry pie recipes. We don't routinely have cherries and definitely do not just sit around and eat them like we do our favorite summer berries. However, my little man was very curious about the container of cherries and the other morning it got very quiet while i was changing a load of laundry and I found him in the kitchen up on a chair sampling the cherries.

It was very adorable to walk in the room to see him with red juice smeared on his face and cherry in hand.  Needless to say he was looking forward to the cherry pie too!

I found this pin on Pinterest for Fresh Cherry Pie.

Continue to read below for my tutorial and photo documentary.

Fresh Cherry Pie


Ingredients:
2 prepared pie crusts rolled and ready to use
                  {I used Meijer ready to use crusts}
5 cups Bing cherries 
3/4 cup sugar
3 Tbsp. cornstarch
2 Tbsp. water
1 Tbsp. fresh lemon juice
1/4 tsp. almond extract
3 Tbsp. unsalted butter

Directions:
Preheat oven to 400 degrees F.

Fit one of the rolled pie crusts in a 9 to 10″ deep dish pie plate.


Place the pitted cherries in a large bowl. Sprinkle with sugar and cornstarch. Toss.
Add water, lemon juice, and almond extract. Toss again to coat, making sure no lumps of sugar or cornstarch remain.

Pour the cherries into the prepared pie plate. Dot with the 3 Tbsp. unsalted butter.

Fit the second rolled pie crust on top of the filling and crimp the edge to seal the top and bottom crust together. Use a fork to poke holes along the top of the pie.  

Put pie in oven. Place a parchment or foil-lined baking sheet on a lower rack to catch any overflowing juices.

Bake at 400 degrees F for 30 minutes. Lower oven to 350 degrees F, and let the pie continue to bake for an additional 30-45 minutes, or until the top and bottom are golden brown, and the juices are bubbling and syrupy.

 Cool the finished pie on a rack until ready to serve. 

Serve and enjoy! 

We added a scoop of vanilla ice cream with our first serving of pie.
My father-in-law was very kind in stating the ice cream took away from the cherries.
You'll have to make the decision if you want ice cream or not. One thing you will not have to decide is if this pie is good. It is not just good, it is delicious!

Wednesday, July 11, 2012

{MWW} No Bake Cookies & Cream {Oreo} Bars


No Bake Cookies & Cream {Oreo} Bars 

So...have you seen this delicious-ness on Pinterest?

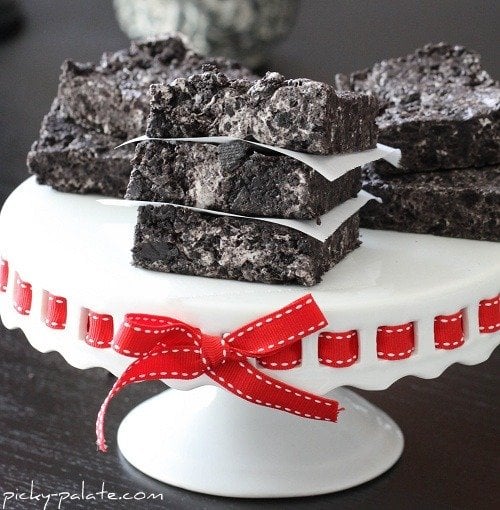
NO WAY. 1 package Oreos, 5 cups of marshmallows, 4 tablespoons of butter - just like rice krispies treats, except Oreos!  "lumps of coal"

The photo above was a pin was from sweetpeaskitchen.com and she described them as No Bake Cookies and Cream Bars. 


The initial recipe source was from picky-palate.com. 

A few weekends ago, my father-in-law {a.k.a. Oreo lover} was visiting and I just knew it was time to pull out the recipe and make this special treat! We were celebrating Father's Day a few weeks late and to keep with tradition, Granddad got his favorite dessert.  Okay, he actually hadn't tried it yet to know if it was his favorite, but I determined it would be once he ate it.  And...I was right! Grandma requested the recipe as she heard raving reviews and Granddad was requesting the treat be made again.

I give this chocolate treat 5 stars!  Three simple ingredients make a delicious treat in about 15 minutes.  It is something you can make quickly for dessert at home or to make at the last minute and take to a social gathering.  I can guarantee whoever the audience might be - it won't last long!  Enjoy!


No Bake Cookies & Cream {Oreo} Bars

Ingredients:
15.5oz package of original Oreo cookies
1 regular sized bag of large marshmallows {5 cups}
4TB butter

Directions:


Spray a 9x9 pan with cooking oil to prevent excess stickiness from marshmallows.

Place cookies in a food processor and pulse. I put 5-7 cookies in at a time to ground.
It is amazing that the cream basically disappears and you're left with chocolate crumbs.

In a large pan, melt butter and marshmallow over medium-high heat on stove. Stir frequently.
{You can melt marshmallows & butter in the microwave as the recipe on picky-palate.com states if you choose.}

Remove pan from heat and stir in ground cookie pieces.

Transfer mixture into 9x9 pan.

Let set and cool for approximately 10 minutes.

Since we were celebrating Father's Day, a few tie picks were added for decor.

Cut, serve, and enjoy!


Tuesday, July 3, 2012

decked out in red, white and blue!

It is just unbelievable that tomorrow is the 4th of July!  For many, this holiday week is full of barbeques, fireworks, and fun poolside or lakeside in the company of family and friends.  While all of this is very appealing, I do hope that you take the opportunity to stop and reflect on the sacrifices that have been made so we can enjoy freedom in the USA. 
In the spirit of celebrating our freedom and my love for the red, white and blue I am sharing a few decor items I have created and display in our home for this festive holiday.

 Two years ago I created a very simple table runner to fit the top of our IKEA bookshelf from some star cotton fabric purchased at JoAnn Fabric and Craft Store. Red, white and blue star appliques adorn the table runner.

Last year I decided my decor needed some framed art so I created two simple pieces. I actually came across a piece of scrapbook paper in my stash that had the Statue of Liberty on it so I simply cut it down to fit in my 5x7 frame and voila! The LA frame is also from JoAnn Fabric and Craft Store.  The second framed art piece I created was the "land that I love".  I found the image of the United States of America online, printed it on cardstock and carefully cut it out.  I then took a piece of blue scrapbook paper with white stars and adhered the USA image onto it.  Lastly, I raided my sticker stash and spelled out "land that I love" added a heart and placed the piece in the frame.  The 8x10 frame was purchased in a 3pk from Target. And there you have my easy, peasy yet cute framed art!

 I wrapped my candles with some red, white and clear plastic star garland I found at the local Kroger grocery store.  I love when things are mounted on wire as you can place it anywhere!  The stars gave a nice look to my plain jane candle holders.

Last year we took a trip back to our hometown with our almost 4-month-old son over the Fourth of July weekend.  We planned a big party for all of our extended family and friends to come and "Catch Up With Colton".  I of course had to make him some festive attire for the big celebration.  I had some fabric left over from my table runner so I used it to create a burp cloth, bib, and a tie onesie. He was definitely proud to be an American!

Isn't he the cutest?!
 
Happy 4th of July!
 

Sunday, July 1, 2012

first feature

Happy July!

I want to take this time to recognize and thank a friend for her awesome lovin' and support of my blog. Emily and I met while we were pursuing Early Childhood Education degrees at Illinois State University.  Her love for Jesus, passion for educating and zest for life immediately created the foundation of our friendship.  Emily continues to inspire me through her blog as she documents her journey of wading through crafts, the bible and lots of poopy diapers. Emily just started a weekly blog post called Pinned it! Did it! documenting the journey of pinning something on Pinterest and applying it to your life making it more than just an image on your Pinterest board.  She invited her blog readers to submit something they have done to be featured on her blog. Emily was so sweet to share my Mouth-Watering Wednesday: Barbeque Chicken as her first

pinned it friday feature

Thank you my dear and I look forward to reading your Pinned it. Did it! Friday Features. If you are visiting from knee deep in the baby pool, welcome and thanks for taking the time to read this post.  May you find something here at forever fancy by faye that will inspire you to add a little fancy to your life!
Related Posts Plugin for WordPress, Blogger...